

PAINTING
The painting follows my well known method of working from dark to light shaded form a black undercoat. This
 three, four or more colour painting method uses
 successive tones of colour (shade, middle and light)
 which are added to the model in layers, working up from
 dark to light, creating a bold three-dimensional effect of
 shadows and highlights, the layers of colour giving
 greater depth and contrast to the model.
 THE PAINT
I used Army Painter paints to paint the Necromancers,
 mixing up colours to suit my style and preferences. They
 provide an adequate range of colours for almost all
 needs, but you will often need to mix colours to get the
 desired results. The amount of paint you squeeze out to
 use is harder to judge, I usually mix up more than I need,
 which better than not having enough.
 Lastly don’t get too much paint on your brush, less than a
 third of the way up the hairs on the brush in the paint is
 plenty, never dip the brush all the way up to the metal
 ferrule, or you will ruin that brush and your painting.
  THE EYES
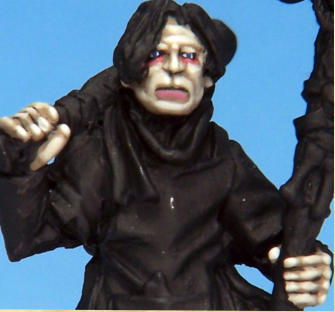
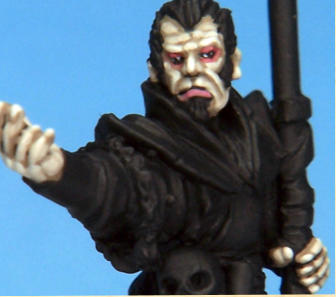
These models have well defined eyes. I paint the eyes
 first so I can get them right before doing the rest of the
 model, as if the eyes are not good it will spoil the rest of
 the paint job! If you are not confident about painting eyes
 leave them unpainted, it will look fine.
 The whites of the eyes are in AP-WP1102 - Matt White,
 no prizes, I painted in with a Army Painter Masterclass
 Kolinsky Brush. Follow the detail on the model, and don’t
 from dark to light shaded form a black undercoat. This
 three, four or more colour painting method uses
 successive tones of colour (shade, middle and light)
 which are added to the model in layers, working up from
 dark to light, creating a bold three-dimensional effect of
 shadows and highlights, the layers of colour giving
 greater depth and contrast to the model.
 THE PAINT
I used Army Painter paints to paint the Necromancers,
 mixing up colours to suit my style and preferences. They
 provide an adequate range of colours for almost all
 needs, but you will often need to mix colours to get the
 desired results. The amount of paint you squeeze out to
 use is harder to judge, I usually mix up more than I need,
 which better than not having enough.
 Lastly don’t get too much paint on your brush, less than a
 third of the way up the hairs on the brush in the paint is
 plenty, never dip the brush all the way up to the metal
 ferrule, or you will ruin that brush and your painting.
  THE EYES
These models have well defined eyes. I paint the eyes
 first so I can get them right before doing the rest of the
 model, as if the eyes are not good it will spoil the rest of
 the paint job! If you are not confident about painting eyes
 leave them unpainted, it will look fine.
 The whites of the eyes are in AP-WP1102 - Matt White,
 no prizes, I painted in with a Army Painter Masterclass
 Kolinsky Brush. Follow the detail on the model, and don’t
worry if you don’t get it quite right because you can always neaten up the white with some AP-WP1101 - Matt
Black. Then I painted in the iris, just a dot using the same
brush, with AP-WP1101 - Matt Black for the Wizard and
 Dark Blue AP-WP1116 - Deep Blue, for the Apprentice.
 Make sure the position of the iris in each eye match, best
 not to make them crossed eyed!
FLESH
Probably the most important part of the models. Before
 painting I thinned the paint slightly with an acrylic thinner,
 with also help to release any trapped air bubbles in the
 paint. I painted the first layer all over the flesh areas,
 taking extra care around the eyes, and leaving a tiny bit
 of black showing between the fingers and between lips, I
 always do all these hard bits first and then fill in the rest.
 I applied this with a Army Painter Masterclass Kolinsky
 Brush. Then successive layers go over this forming the
 shaded effect. Pay particular attention to the nose and to
 delineate the fingers and knuckles.
 1.
Pure AP-WP1120 - Monster Brown goes all over
the flesh.
2.
Then AP-WP1120 - Monster Brown mixed with
AP-WP1102 - Matt White.
3.
Then more AP-WP1102 - Matt White.
4.
And more AP-WP1102 - Matt White.
5.
And still more AP-WP1102 - Matt White.
6.
Plus a tiny bit of AP-WP1104 - Pure Red
(for the lips and eyes rims).
This flesh colour still gives him a cold and clammy look,
 while still being different enough from the bone colour of
 the skeletons he might well raise.
 always neaten up the white with some AP-WP1101 - Matt
Black. Then I painted in the iris, just a dot using the same
brush, with AP-WP1101 - Matt Black for the Wizard and
 Dark Blue AP-WP1116 - Deep Blue, for the Apprentice.
 Make sure the position of the iris in each eye match, best
 not to make them crossed eyed!
FLESH
Probably the most important part of the models. Before
 painting I thinned the paint slightly with an acrylic thinner,
 with also help to release any trapped air bubbles in the
 paint. I painted the first layer all over the flesh areas,
 taking extra care around the eyes, and leaving a tiny bit
 of black showing between the fingers and between lips, I
 always do all these hard bits first and then fill in the rest.
 I applied this with a Army Painter Masterclass Kolinsky
 Brush. Then successive layers go over this forming the
 shaded effect. Pay particular attention to the nose and to
 delineate the fingers and knuckles.
 1.
Pure AP-WP1120 - Monster Brown goes all over
the flesh.
2.
Then AP-WP1120 - Monster Brown mixed with
AP-WP1102 - Matt White.
3.
Then more AP-WP1102 - Matt White.
4.
And more AP-WP1102 - Matt White.
5.
And still more AP-WP1102 - Matt White.
6.
Plus a tiny bit of AP-WP1104 - Pure Red
(for the lips and eyes rims).
This flesh colour still gives him a cold and clammy look,
 while still being different enough from the bone colour of
 the skeletons he might well raise.


