











During the recent heavy lock down period Kev Dallimore and I managed to cooperate on a joint personal project
 whilst simultaneously keeping socially distant. In Part
 One we explained why we did this. In this part we
 conclude (almost), as all projects of this type should, with
 the painting of the toys.
We had both been inspired by the release of the new
 Oathmark rules by Osprey and built these armies based
 firmly on Tolkien’s works (specifically the Lord of the
 Rings) but see Part One for details on that. We also
 wanted to add one other element that isn’t covered by
 Oathmark and that’s not surprising: they are decidedly
 not a Tolkien based rule set. However we are getting
 ahead of ourselves but – ‘bear’ that in mind!
 PAINT
As we said last month, the figures were assembled from a
 selection of plastic Oathmark models with a fair number of
 swaps and amendments to the models to stretch what we
 had available under lock-down. But what we ended up
 with was two armies; about 60 figures for the good guys
 and 85 or so for the baddies: it was a lot of figures and we
 had to develop a strategy for how we would divvy up the
 paint work and yet play to each of our individual strengths.
 FORCES OF EVIL
Well we started with the baddies as there were more of
 them and we figured that if we got those done there would
 no stopping us!
 It was decided Kev would paint a whole unit as a kind of
 style guide and proof of concept and then we would split
 the painting up between us. As you can well imagine, this
 brought its own problems. Although in the past I have
 painted using the three colour triads over black undercoat
 process, in the last decade or so I have rather more
 resorted to block painting, and a swift dry brush with a dip
 of (usually) Army Painter Strong or Dark Tone varnish –
 particularly on 15mm models. Kev Dallimore... well, not so
 much. So this was going to be a trial: Kev was under the
 strictest orders just to paint the figures with no shading
 and even no highlighting. Sharp intakes of breath.
RAPIDO
But this, remember, was all about speed. So we decided
 to stick to that ‘lack of shading/highlighting’ regime and so
 we went for a straight, neat paint job in just block colours.
 We used Army Painter Warpaints throughout (both of us
 and I managed to cooperate on a joint personal project
 whilst simultaneously keeping socially distant. In Part
 One we explained why we did this. In this part we
 conclude (almost), as all projects of this type should, with
 the painting of the toys.
We had both been inspired by the release of the new
 Oathmark rules by Osprey and built these armies based
 firmly on Tolkien’s works (specifically the Lord of the
 Rings) but see Part One for details on that. We also
 wanted to add one other element that isn’t covered by
 Oathmark and that’s not surprising: they are decidedly
 not a Tolkien based rule set. However we are getting
 ahead of ourselves but – ‘bear’ that in mind!
 PAINT
As we said last month, the figures were assembled from a
 selection of plastic Oathmark models with a fair number of
 swaps and amendments to the models to stretch what we
 had available under lock-down. But what we ended up
 with was two armies; about 60 figures for the good guys
 and 85 or so for the baddies: it was a lot of figures and we
 had to develop a strategy for how we would divvy up the
 paint work and yet play to each of our individual strengths.
 FORCES OF EVIL
Well we started with the baddies as there were more of
 them and we figured that if we got those done there would
 no stopping us!
 It was decided Kev would paint a whole unit as a kind of
 style guide and proof of concept and then we would split
 the painting up between us. As you can well imagine, this
 brought its own problems. Although in the past I have
 painted using the three colour triads over black undercoat
 process, in the last decade or so I have rather more
 resorted to block painting, and a swift dry brush with a dip
 of (usually) Army Painter Strong or Dark Tone varnish –
 particularly on 15mm models. Kev Dallimore... well, not so
 much. So this was going to be a trial: Kev was under the
 strictest orders just to paint the figures with no shading
 and even no highlighting. Sharp intakes of breath.
RAPIDO
But this, remember, was all about speed. So we decided
 to stick to that ‘lack of shading/highlighting’ regime and so
 we went for a straight, neat paint job in just block colours.
 We used Army Painter Warpaints throughout (both of us
OATHMARK EXPRESS
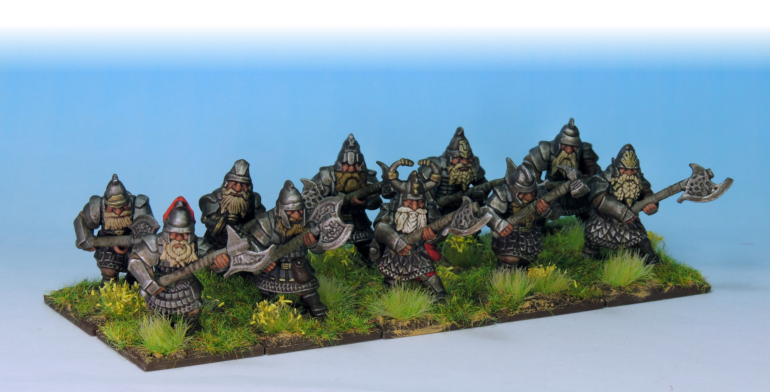
Above. Armoured Dwarves – Kings Body Guard (Line Breaker).
had a good supply in stock and so could match colours with each other’s work) and very good they were too, all
 supplied by North Star.
 Over that we then used the afore mentioned Army
 Painter Quickshade Strongtone varnish to provide all
 the shading and contrast. Now – for this to work
 successfully – the whole process rather relied on two
 main things: the quality of the models and the neatness of
 our painting, the former was not a problem: they have lots
 of detail that the toned varnish will settle into. As for the
 latter – the neatness part – well it’s horses for courses: it
 wasn’t a problem for Kev but – inevitably – it was for me...
  PRIMER
The models were sprayed up with grey car primer, very
 lightly, and then Army Painter Leather Brown Coloured
 Primer Spray. This was a compromise forced somewhat
 by simply what we had in stock. We settled on a brown as
 it would be a good basis for the orcs and goblins, being
 the flesh colour for these models and we felt the Wargs
 could be mostly brown too. Lacking any double sided
 tape, the models were tacked to long card strips with
 three layers of Sellotape (one face up, two face down to
 keep them in place. This format allowed not just ease of
 transportation in their unpainted state, but quick spraying
 without losing any of the models, and it was all done
 outside in our gardens for maximum ventilation.
  BLOCKS OF COLOURS
I did the main blocks of colours and Kev generally did
 smaller details and a tidy up any missteps (ie the bits
 John missed). And this worked pretty well, although both
 strayed a bit. Generally I used darker colours – like the
 black – in a thin ‘semi-wash’ so that the under-colour
 brown showed through as highlights, getting a little extra
 free shading with no effort (eat your heart out ‘Contrast
 Paints’...). Kev had to force himself to not put the paint on
 too thick at this stage as he was used to adding colours
 over the top to get shading – which we were definitely not
 going to do! The downside, of course, was that my colours
 could be a little haphazard (and his Orc shield designs
 were... well: who said Orcs were professional artists!) and
 Kev would then spend too long painting fiddly bits.
  When doing this kind of fast job with the plan to use Army
 Painter Quickshade it is best to be neat as you can as
 the final result really does reflect this. And Kev just can’t
 help being neat!
 with each other’s work) and very good they were too, all
 supplied by North Star.
 Over that we then used the afore mentioned Army
 Painter Quickshade Strongtone varnish to provide all
 the shading and contrast. Now – for this to work
 successfully – the whole process rather relied on two
 main things: the quality of the models and the neatness of
 our painting, the former was not a problem: they have lots
 of detail that the toned varnish will settle into. As for the
 latter – the neatness part – well it’s horses for courses: it
 wasn’t a problem for Kev but – inevitably – it was for me...
  PRIMER
The models were sprayed up with grey car primer, very
 lightly, and then Army Painter Leather Brown Coloured
 Primer Spray. This was a compromise forced somewhat
 by simply what we had in stock. We settled on a brown as
 it would be a good basis for the orcs and goblins, being
 the flesh colour for these models and we felt the Wargs
 could be mostly brown too. Lacking any double sided
 tape, the models were tacked to long card strips with
 three layers of Sellotape (one face up, two face down to
 keep them in place. This format allowed not just ease of
 transportation in their unpainted state, but quick spraying
 without losing any of the models, and it was all done
 outside in our gardens for maximum ventilation.
  BLOCKS OF COLOURS
I did the main blocks of colours and Kev generally did
 smaller details and a tidy up any missteps (ie the bits
 John missed). And this worked pretty well, although both
 strayed a bit. Generally I used darker colours – like the
 black – in a thin ‘semi-wash’ so that the under-colour
 brown showed through as highlights, getting a little extra
 free shading with no effort (eat your heart out ‘Contrast
 Paints’...). Kev had to force himself to not put the paint on
 too thick at this stage as he was used to adding colours
 over the top to get shading – which we were definitely not
 going to do! The downside, of course, was that my colours
 could be a little haphazard (and his Orc shield designs
 were... well: who said Orcs were professional artists!) and
 Kev would then spend too long painting fiddly bits.
  When doing this kind of fast job with the plan to use Army
 Painter Quickshade it is best to be neat as you can as
 the final result really does reflect this. And Kev just can’t
 help being neat!
COLOUR SCHEMES
We decided on broad colour schemes for each unit and tried to stick to them as we were trying to create a good
 overall look for the units, not great individual figures. This
 meant that there was lots and lots of black on the White
 Hand troops, and lots of red on the Dol Guldur chaps.
 Having a degree on uniformity in the unit adds to the
 overall neat effect and it makes them easier to identify
 different (often quite similar) Orc types on the table top.
 Also we picked colours that would look best when shaded
 with the brownish tint imbued by the Quickshade.
 tried to stick to them as we were trying to create a good
 overall look for the units, not great individual figures. This
 meant that there was lots and lots of black on the White
 Hand troops, and lots of red on the Dol Guldur chaps.
 Having a degree on uniformity in the unit adds to the
 overall neat effect and it makes them easier to identify
 different (often quite similar) Orc types on the table top.
 Also we picked colours that would look best when shaded
 with the brownish tint imbued by the Quickshade.
THAT’S IT... ALMOST
And that, boys and girls, was it. One layer of paint, no highlighting: just neatness, good models and good basing,
 and it gets them fighting on the table or would if it weren’t
 for the virus shenanigans. And the dragon was done in the
 same way as the troll and he was a real bugger to fit on
 the base… Oh: did we not mention, Kev painted a Dragon
 as well? All they need is someone to actually fight...
GOODY TWO SHOES
The Forces of Good follow a similar pattern, but with even
 more uniformity and perhaps a few brighter colours. As
 examples of the work, the Armoured Dwarves, Light Wood
 Elves with Bows and Beorning Militia are examples of this
 approach. The Armoured Dwarves were primed with
 Platemail (lots of armour so it made sense) and the Wood
 Elves with Army Green and then colours as appropriate.
 All are Army Painter spray primer cans. Oh, and of course,
there’s Beorn in bear form.
 highlighting: just neatness, good models and good basing,
 and it gets them fighting on the table or would if it weren’t
 for the virus shenanigans. And the dragon was done in the
 same way as the troll and he was a real bugger to fit on
 the base… Oh: did we not mention, Kev painted a Dragon
 as well? All they need is someone to actually fight...
GOODY TWO SHOES
The Forces of Good follow a similar pattern, but with even
 more uniformity and perhaps a few brighter colours. As
 examples of the work, the Armoured Dwarves, Light Wood
 Elves with Bows and Beorning Militia are examples of this
 approach. The Armoured Dwarves were primed with
 Platemail (lots of armour so it made sense) and the Wood
 Elves with Army Green and then colours as appropriate.
 All are Army Painter spray primer cans. Oh, and of course,
there’s Beorn in bear form.

Building armies under duress. Part 2: Paint
By John Treadaway
and Kev Dallimore
I would go through and blitz the big areas the Kev would tidy and detail, and that was it. Well mostly. Short of me
 driving around to his house and rapping his fingers with a
 wooden ruler, Kev couldn’t resist doing just a tiny bit of
 dry-brushing on one of the warg units, giving them grey
 wargs. But I got my own back and insisted on shield
 designs to differentiate the units, so white hands were
 added to the Saruman forces, red eye symbols for the Dol
 Guldur boys and a single ‘Misty Mountain’ (looking a lot
 like a Greek lambda), for the mountain troops. As for other
 colour choices, we didn’t leave too much in the leather
 brown primer showing, but we did with some of it: the
 flesh obviously, plus some belts and boots and jerkins.
 tidy and detail, and that was it. Well mostly. Short of me
 driving around to his house and rapping his fingers with a
 wooden ruler, Kev couldn’t resist doing just a tiny bit of
 dry-brushing on one of the warg units, giving them grey
 wargs. But I got my own back and insisted on shield
 designs to differentiate the units, so white hands were
 added to the Saruman forces, red eye symbols for the Dol
 Guldur boys and a single ‘Misty Mountain’ (looking a lot
 like a Greek lambda), for the mountain troops. As for other
 colour choices, we didn’t leave too much in the leather
 brown primer showing, but we did with some of it: the
 flesh obviously, plus some belts and boots and jerkins.
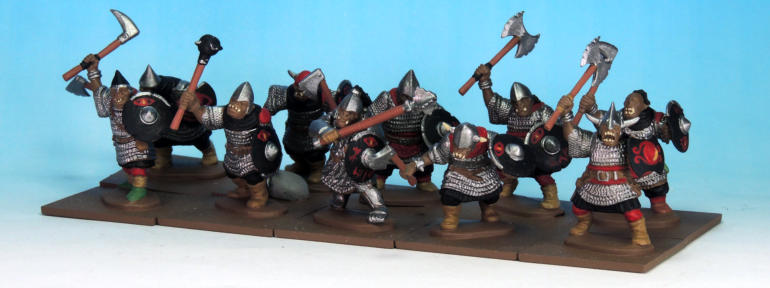
Above. Dol Guldur Great Orcs with colours painted in.
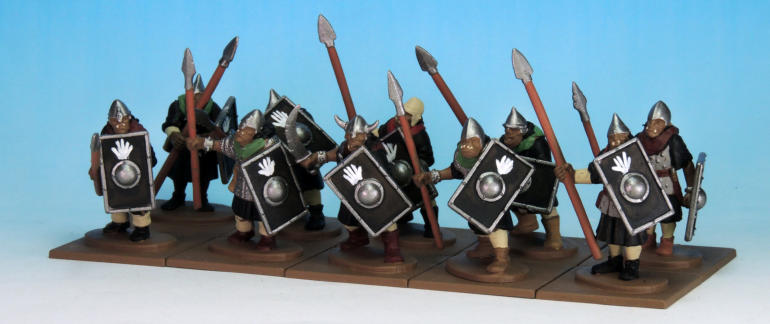
Above. Half Orcs of The White Hand (Orc Spear) with colours painted in.
.
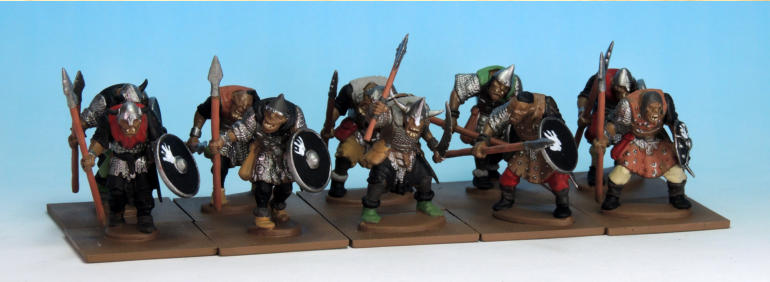
Above. Orc Spearmen of the White Hand (Orc Spearmen) with colours painted in.
QUICKSHADE
Once were happy we had done all we could needed it was time for the Quickshade. Now Army Painter themselves
 recommend dipping the models into the tin and the flicking
 off the excess and leaving the thing to dry. That’s certainly
 the method usually used by me with blocks of 15mm
 figures. However Kev – who had been tasked with
 varnishing – wasn’t happy with this approach, as he had
 some experience using varnishes with stains in to
 recondition many old models, many years ago. We
 decided that Kev was allowed to deviate from the holy writ
 and apply the Quickshade with a brush: said that this
 allowed greater control and more of that neatness. And he
 was right. After painting on a fairly generous coat of the
 Quickshade to ten models he would go back to them just
 to check there were not horrible runs or big blobs
 obscuring details, clearing them with a flick of the brush,
 and also applying a bit more Quickshade to accentuate
 some details. Easy. Mind you, if it’d been up to me, I’d
 have been flicking them up the garden but – fortunately –
 it wasn’t!
VARNISH
As these models are to be troops on the table and not
 cabinet pieces they needed a good protective coat of
 varnish. This was in fact two coats of Anti-Shine Matt
 Varnish which – again – was brushed on.
 FINISHING
What really sells these models as good wargaming, “get
 the damn things on the table and start playing with them”
 time for the Quickshade. Now Army Painter themselves
 recommend dipping the models into the tin and the flicking
 off the excess and leaving the thing to dry. That’s certainly
 the method usually used by me with blocks of 15mm
 figures. However Kev – who had been tasked with
 varnishing – wasn’t happy with this approach, as he had
 some experience using varnishes with stains in to
 recondition many old models, many years ago. We
 decided that Kev was allowed to deviate from the holy writ
 and apply the Quickshade with a brush: said that this
 allowed greater control and more of that neatness. And he
 was right. After painting on a fairly generous coat of the
 Quickshade to ten models he would go back to them just
 to check there were not horrible runs or big blobs
 obscuring details, clearing them with a flick of the brush,
 and also applying a bit more Quickshade to accentuate
 some details. Easy. Mind you, if it’d been up to me, I’d
 have been flicking them up the garden but – fortunately –
 it wasn’t!
VARNISH
As these models are to be troops on the table and not
 cabinet pieces they needed a good protective coat of
 varnish. This was in fact two coats of Anti-Shine Matt
 Varnish which – again – was brushed on.
 FINISHING
What really sells these models as good wargaming, “get
 the damn things on the table and start playing with them”
armies is the final stage. Or ‘basing’ as we call it. Kev was charged with this task. It can be a dull task but then the
 final results will reward some little effort. The master-stoke
 we utilised (and one Kev had been dubious about for
 years) is the use of a ready-mixed, all-in-one basing
 compound. Following a recipe gleaned from Matakishi (of
 on-line resource Matakishi Tea House) I make the stuff up
 in two litre batches resulting in large, cheap tubs full of a
 glutinous, chocolate brown, gritty paste. It does look
 disgusting (we won’t tell of its rather earthy nickname but
 – if you spill it – it will stick to a blanket) however it’s self-
 coloured (saving a whole painting process) and dries to a
 rock hard with a mostly matt-textured finish and saves
 time and effort.
  The ‘paste’ goes on the square plastic supplied base and
 is thick enough to disguise the smaller, round model’s
 base without the need for any other ‘filler’. It is applied
 with an old and very blunt scalpel. One has to be careful
 to cover the whole base and not get it up the models legs!
 Left to dry overnight it reveals itself to be an ideal textured
 surface that one could easily leave ‘as it’ with little further
 work required. However – as this was Kev’s task – it didn’t
 end there. Once the compound was thoroughly dry and
 hard it was dry-brushed with Warpaint Desert Yellow, in a
 fairly rough manner: it didn’t have to be too neat as most
 of it would be covered with flock.
 The flock is a tuft or two from the Army Painter 77 Tufts
 range, and then a load of loose short nylon grass flock,
 covering a good deal of the base, Kev can’t remember the
 manufacturer but it was probably Heki . The loose flock is
 stuck into place with good old PVA wood glue and then
 left to dry.
 charged with this task. It can be a dull task but then the
 final results will reward some little effort. The master-stoke
 we utilised (and one Kev had been dubious about for
 years) is the use of a ready-mixed, all-in-one basing
 compound. Following a recipe gleaned from Matakishi (of
 on-line resource Matakishi Tea House) I make the stuff up
 in two litre batches resulting in large, cheap tubs full of a
 glutinous, chocolate brown, gritty paste. It does look
 disgusting (we won’t tell of its rather earthy nickname but
 – if you spill it – it will stick to a blanket) however it’s self-
 coloured (saving a whole painting process) and dries to a
 rock hard with a mostly matt-textured finish and saves
 time and effort.
  The ‘paste’ goes on the square plastic supplied base and
 is thick enough to disguise the smaller, round model’s
 base without the need for any other ‘filler’. It is applied
 with an old and very blunt scalpel. One has to be careful
 to cover the whole base and not get it up the models legs!
 Left to dry overnight it reveals itself to be an ideal textured
 surface that one could easily leave ‘as it’ with little further
 work required. However – as this was Kev’s task – it didn’t
 end there. Once the compound was thoroughly dry and
 hard it was dry-brushed with Warpaint Desert Yellow, in a
 fairly rough manner: it didn’t have to be too neat as most
 of it would be covered with flock.
 The flock is a tuft or two from the Army Painter 77 Tufts
 range, and then a load of loose short nylon grass flock,
 covering a good deal of the base, Kev can’t remember the
 manufacturer but it was probably Heki . The loose flock is
 stuck into place with good old PVA wood glue and then
 left to dry.

Above. Dol Guldur Orc Warriors (Orc soldier).
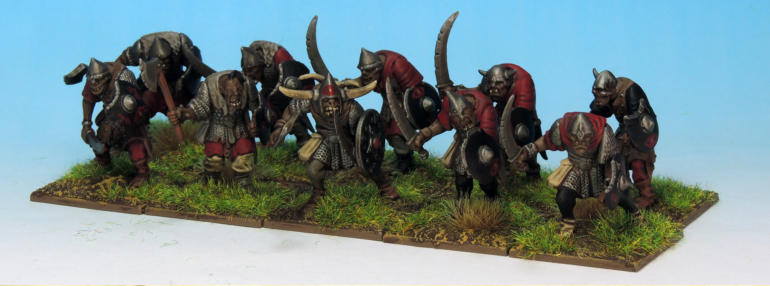
Above. Uruks of the White Hand (Line Breaker).

Above. Mountain Goblin Archers.
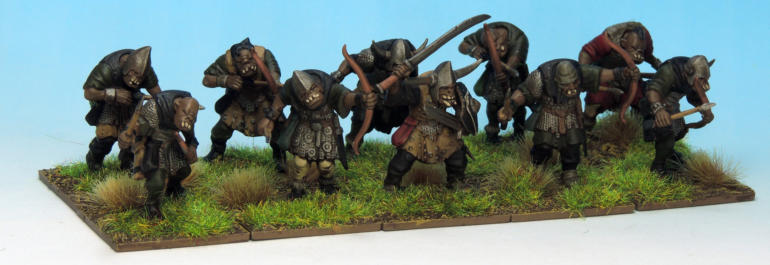
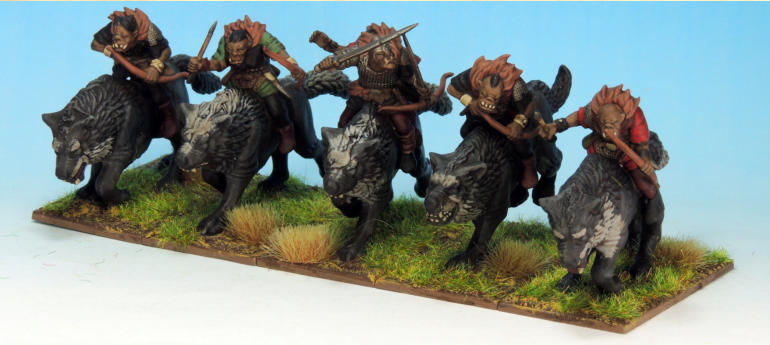
Above. Goblin Warg Archers (Scout).
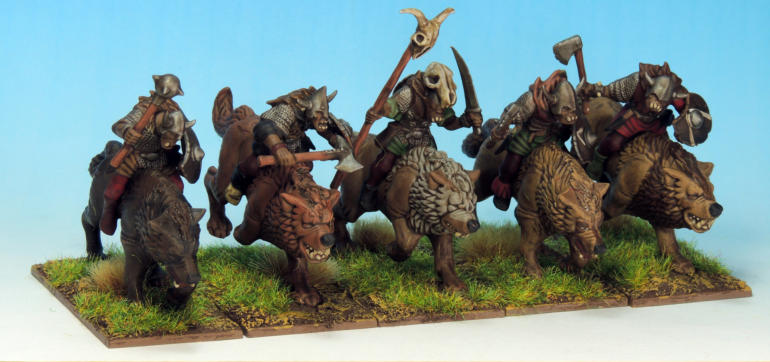
Above. Goblin Warg Riders with Hand Weapons.
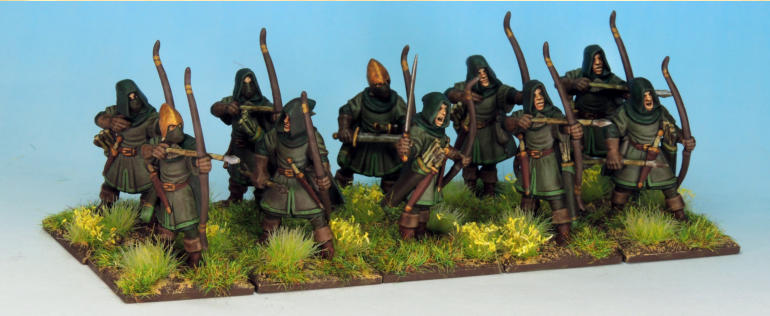
Above. Light Wood Elves with Bows (rangers).
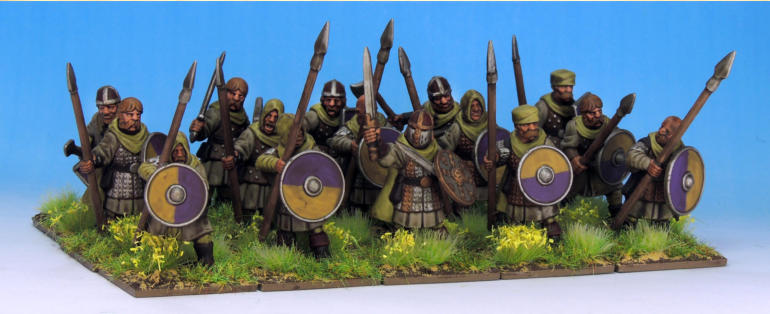
Above. Beorning Militia (Human spearmen).
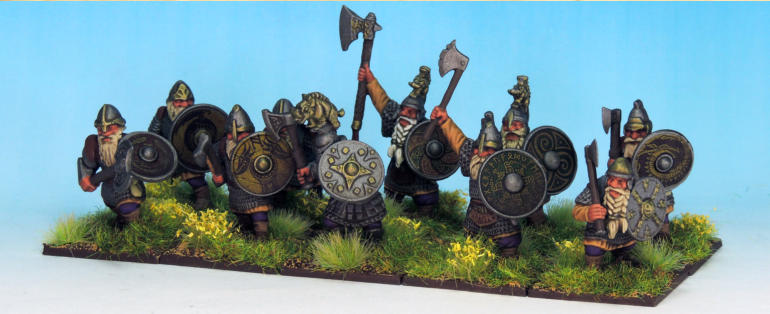
Above. Shielded Dwarves (Dwarf warrior).
Above. Armoured Dwarves – Kings Body Guard primed with Platemail (lots of armour so it made sense).

Above. Armoured Dwarves – Kings Body Guard with colours painted in.

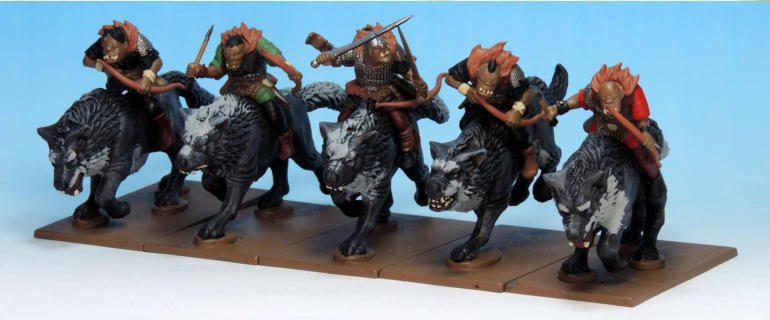
Above. Goblin Warg Archers (Scout).
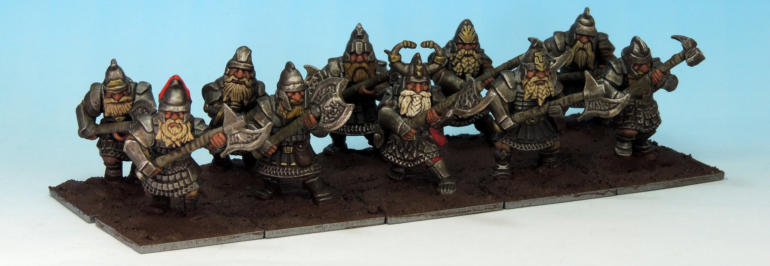
Above. Armoured Dwarves – Kings Body Guard with Quickshade applied, and all-in-one basing compound added.
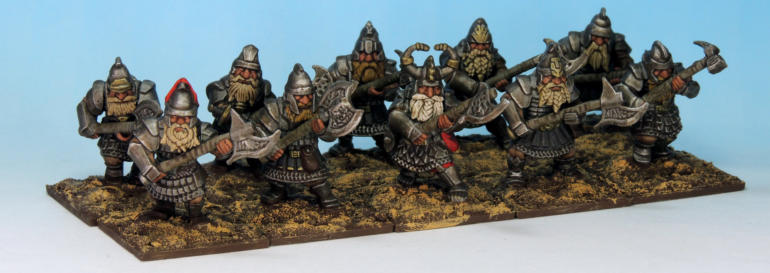
Above. Armoured Dwarves – Kings Body Guard bases dry-brushed with Warpaint Desert Yellow, in a fairly rough manner.
PAINTING BEORN
Well the Bad Guys had an Orc leader and then a troll appeared. And then – incongruously – a dragon (this is
 getting out of hand, Kev...!). So the good guys needed
 something extra, we thought. In fact, it was a simple bear
 necessity...
The big fellow was sprayed with the same Army Painter
 Leather Brown as the evil troops (as indeed were the
 Beorning Militia to accompany him). He was then sprayed,
 very lightly, from the above direction only with Army
 Painter Yellow Sand Colour Primer Spray, just a touch to
 vary the fur colour. Then the claws and teeth painted in
 Skeleton Bone and his nose in black. He then got the
 Quickshade with a brush treatment and was put aside to
 dry. Again a very fast paint job.
In Oathmark we couldn’t find a prototype to do justice to
 the mighty skin-changing, goblin beheading maniac so we
 made something mad up as follows!
 appeared. And then – incongruously – a dragon (this is
 getting out of hand, Kev...!). So the good guys needed
 something extra, we thought. In fact, it was a simple bear
 necessity...
The big fellow was sprayed with the same Army Painter
 Leather Brown as the evil troops (as indeed were the
 Beorning Militia to accompany him). He was then sprayed,
 very lightly, from the above direction only with Army
 Painter Yellow Sand Colour Primer Spray, just a touch to
 vary the fur colour. Then the claws and teeth painted in
 Skeleton Bone and his nose in black. He then got the
 Quickshade with a brush treatment and was put aside to
 dry. Again a very fast paint job.
In Oathmark we couldn’t find a prototype to do justice to
 the mighty skin-changing, goblin beheading maniac so we
 made something mad up as follows!
A
M
F
S
D
CD
H
Pts
Special
Base
3
7
4
0
10
3
4
100
Horrific, Charge (3), Wild Charge, Nimble,
50 x 50
Regenerate, Command (2), Large
Equipment: None. Well, a Goblin’s head on a spike possibly, just for laughs!
CONCLUSIONS
We got off to a fast start but – frankly – slowed somewhat. This was due to a number of
 factors: personal circumstances, work and the
 damned restrictions of lock-down plus the
 difficulty in coordinating this over two
 households in safety: not an easy task. But
 there was also the very real problem with and
 increasingly troublesome question of “when oh
 when are we going to be able to actually use
 them and play a game together?”. That’s been
 a little demoralising and has taken some of the
 wind out of our sails.
 However, on the positive side, we have built
 two whole LotR based armies in double quick
 time and neither of us had managed this in
 decades. So: chin up! Every cloud has a
 Mithril silver lining.
 somewhat. This was due to a number of
 factors: personal circumstances, work and the
 damned restrictions of lock-down plus the
 difficulty in coordinating this over two
 households in safety: not an easy task. But
 there was also the very real problem with and
 increasingly troublesome question of “when oh
 when are we going to be able to actually use
 them and play a game together?”. That’s been
 a little demoralising and has taken some of the
 wind out of our sails.
 However, on the positive side, we have built
 two whole LotR based armies in double quick
 time and neither of us had managed this in
 decades. So: chin up! Every cloud has a
 Mithril silver lining.
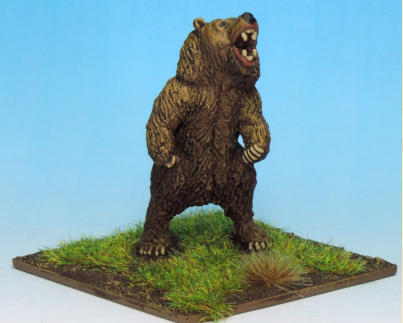
Right. Beorn, the mighty skin-
changing, goblin beheading maniac.


