


In this follow-up article I will go through the approach I have to painting the plastic elf soldiers, the techniques would also apply
to any of the vast numbers plastics now available.
INSPIRATION
I had in my minds eye the sort of colours I would go for, and
after seeing Andrew Taylor’s wonderful painting of them I
realised I would do, keeping to a similar palette but more grey,
and using less blue. Also I decided to use the very nice shield
decals made for the plastic elves by LBM studios, as I had not
really used the before, preferring to paint shield designs.
UNDERCOATING
With the elves carefully assembled as detailed last time, when
they are fully cured, you can go straight to the undercoating.
Undercoating is essential as it provides a consistent surface on
which to apply the next coats of paint. For the undercoat I used
Humbrol enamel matt black. I usually undercoat in oil based
paint as I find they give better coverage on the plastic.
I brushed the paint on with a Warpaints Small Drybrush brush
making sure I covered the entire model. Don’t let the paint pool
anywhere as this will dry very thick and could obscure details.
Also watch out for any stray hairs detaching from your brush
and sticking to the model during undercoating. Pull them off
with tweezers before they become permanently attached! Take
particular care not to clog up the face and similar fine detail
areas, don’t be afraid to go back and clear runs or blobs of
undercoat off with your brush. I then let the undercoat dry
completely before going on to paint the models.
THE PAINT
I used Army Painter War Paints to paint the elves, mixing up
colours to suit my style and preferences. The names here
reference The Mega Paint Set provides an adequate range of
colours for almost all needs, but you will always need to mix
colours to get the desired results, however I have tried to work
out colour combinations to reduce mixing if possible.
PAINTING
The figure painting follows my well known method of working
from dark to light shaded up from a black undercoat. This three,
four or more colour painting method uses successive tones of
colour (shade, middle and light) which are added to the model
in layers, working up from dark to light. This creates a bold
three-dimensional effect of shadows and highlights, the layers
of colour giving greater depth and subtlety to the model. It may
seem counterintuitive if you haven’t painted this way before,
but bear with me.
THE SAME COLOURS
Although I painted up the five elves on the sprue they are
painted up as unit, so I will concentrate on describing the
painting of just one elf as the colours on the rest of the elves are
similar. I will show (lots and lots of) relevant pictures of the
rest of the elves from time to time.
THE METALWORK
Now, normally I would do the flesh first on most models, but
there is a significant amount of armour and chainmail to do on
these models and one of the techniques I use for metalwork can
be a bit messy, I find when using this method it’s easier to get it
all done at once first off. Then you can tidy up and carry on
with the rest of the painting knowing one big job is done.
painting the plastic elf soldiers, the techniques would also apply
to any of the vast numbers plastics now available.
INSPIRATION
I had in my minds eye the sort of colours I would go for, and
after seeing Andrew Taylor’s wonderful painting of them I
realised I would do, keeping to a similar palette but more grey,
and using less blue. Also I decided to use the very nice shield
decals made for the plastic elves by LBM studios, as I had not
really used the before, preferring to paint shield designs.
UNDERCOATING
With the elves carefully assembled as detailed last time, when
they are fully cured, you can go straight to the undercoating.
Undercoating is essential as it provides a consistent surface on
which to apply the next coats of paint. For the undercoat I used
Humbrol enamel matt black. I usually undercoat in oil based
paint as I find they give better coverage on the plastic.
I brushed the paint on with a Warpaints Small Drybrush brush
making sure I covered the entire model. Don’t let the paint pool
anywhere as this will dry very thick and could obscure details.
Also watch out for any stray hairs detaching from your brush
and sticking to the model during undercoating. Pull them off
with tweezers before they become permanently attached! Take
particular care not to clog up the face and similar fine detail
areas, don’t be afraid to go back and clear runs or blobs of
undercoat off with your brush. I then let the undercoat dry
completely before going on to paint the models.
THE PAINT
I used Army Painter War Paints to paint the elves, mixing up
colours to suit my style and preferences. The names here
reference The Mega Paint Set provides an adequate range of
colours for almost all needs, but you will always need to mix
colours to get the desired results, however I have tried to work
out colour combinations to reduce mixing if possible.
PAINTING
The figure painting follows my well known method of working
from dark to light shaded up from a black undercoat. This three,
four or more colour painting method uses successive tones of
colour (shade, middle and light) which are added to the model
in layers, working up from dark to light. This creates a bold
three-dimensional effect of shadows and highlights, the layers
of colour giving greater depth and subtlety to the model. It may
seem counterintuitive if you haven’t painted this way before,
but bear with me.
THE SAME COLOURS
Although I painted up the five elves on the sprue they are
painted up as unit, so I will concentrate on describing the
painting of just one elf as the colours on the rest of the elves are
similar. I will show (lots and lots of) relevant pictures of the
rest of the elves from time to time.
THE METALWORK
Now, normally I would do the flesh first on most models, but
there is a significant amount of armour and chainmail to do on
these models and one of the techniques I use for metalwork can
be a bit messy, I find when using this method it’s easier to get it
all done at once first off. Then you can tidy up and carry on
with the rest of the painting knowing one big job is done.


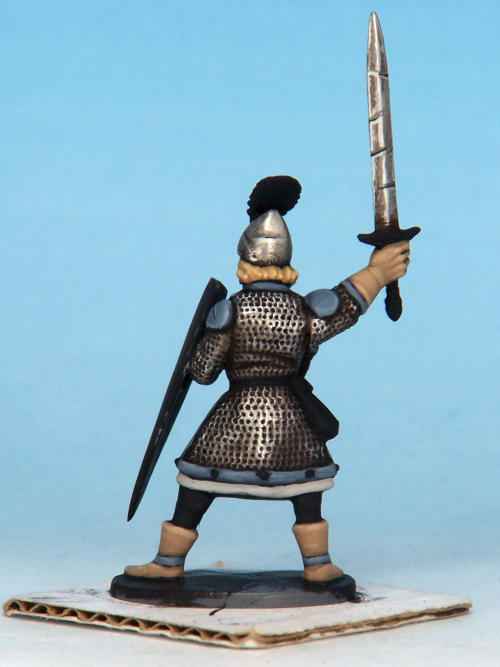
Painting Elves
Above. The painted Elves.

Undercoated elves
DRY BRUSHING
The armour is painted using a technique called dry brushing.
Essentially this is done by using a stiffish, short, brush with a
lot of the paint removed and touching raised sections. Dip the
end of your brush in the paint and make sure all the bristles are
well soaked at the end then remove much of the paint onto a
tissue. Draw the brush back and forth over the high spots of the
model. You will need to brush back and forth several times as
the best effect is achieved with slow gradual build up of paint.
Be wary of the paint drying on the brush. (Dry brushing is a bit
if a misnomer actually, as you will find the brush needs to be
quite wet with paint; however the paint itself needs to be dryer
and thicker than if you were painting normally).
Like normal painting I do three or more layers of dry brushing
as follows. Also slightly confusingly I use a layer of ink
between first two layers.
1.
Gun Metal is applied most thickly, going over all of the
area to be steel type finish.
2.
Dark Tone Ink is then sloshed all over that first coat to
deepen any shadows that might have inadvertently got filled in
by the first coat and to give the metal that, a bit worn, slightly
rusting feel.
3.
Gun Metal again, lightly brushed over again.
4.
Plate Mail Metal is then dry brushed on
5.
Shining Silver is the top coat, well almost, dry brushed
on vary sparingly.
6.
Matt Black is then used to tidy up around where the
paint has gone over where it shouldn’t have, see how neat it
looks now.
7.
Matt Black again, but this time in very small and fine
amounts to add distress and damage marks on the helmets and
swords, each of the marks is highlighted with Shining Silver.
EYES
I normally paint the eyes first so I can get them right before
doing the rest of the model, (but here I did it after the armour as
detailed above), if the eyes are not great it will spoil the rest of
the paint job! I also took the opportunity to paint in some teeth
doing the rest of the model, (but here I did it after the armour as
detailed above), if the eyes are not great it will spoil the rest of
the paint job! I also took the opportunity to paint in some teeth


1. Gun Metal is applied most thickly, going over all of the
area to be steel type finish.


2. Dark Tone Ink is then sloshed all over that first coat to
deepen any shadows that might have inadvertently got filled
in by the first coat and to give the metal that, a bit worn,
slightly rusting feel.

3.Gun Metal again, lightly
brushed over again.

4. Plate Mail Metal is then
dry brushed on.

5. Shining Silver is the top
coat, well almost, dry brushed
on vary sparingly.

6. Matt Black is then used to
tidy up around where the
paint has gone over where it
shouldn’t have.


7. Matt Black again, but this time in very small and fine amounts to add distress and damage marks on the helmets and swords,
each of the marks is highlighted with Shining Silver.


on a couple of the elves. I painted the eyes in with a Warpaints
Insane Detail brush.
1.
The whites are Matt White.
2.
The irises are Deep Blue with a tiny amount of Oak
Brown
Insane Detail brush.
1.
The whites are Matt White.
2.
The irises are Deep Blue with a tiny amount of Oak
Brown
FLESH
I did the flesh next. I wanted the elves face to be mostly smooth
and with few wrinkles or blemishes, no baggy eyelids, also I
wanted a light skin tone so I used the colour combinations
below.
1.
Fur Brown
2.
Tanned Flesh, this follows very much the layer before.
and with few wrinkles or blemishes, no baggy eyelids, also I
wanted a light skin tone so I used the colour combinations
below.
1.
Fur Brown
2.
Tanned Flesh, this follows very much the layer before.


1. The whites of the eyes are Matt White.


2. The irises are Deep Blue with a tiny amount of Oak Brown.
3.
Barbarian Flesh, you can see starting to really pull out
the details.
4.
Barbarian Flesh plus Matt White, now the face really
starts to zing.
5.
plus more Matt White
6.
plus a tiny bit more Matt White
7.
and finally a tiny touch of Pure Red to the flesh mix for
the bottom lip and that is the faces all done.


1. Fur Brown.
2. Tanned Flesh, this follows
very much the layer before.
3. Barbarian Flesh, you can
see starting to really pull out
the details.
4.Barbarian Flesh plus Matt
White, now the face really
starts to zing.

5. plus more Matt White.

6. plus a tiny bit more Matt
White.

7. and finally a tiny touch of Pure Red to the flesh mix for the
bottom lip and that is the faces all done.

HAIR
Had to be blonde elves for me! The hair repays careful painting
delineating the hairs as much as your brush will allow. Colours
are as follows. Be aware you don’t need much brown to darken
this yellow.
delineating the hairs as much as your brush will allow. Colours
are as follows. Be aware you don’t need much brown to darken
this yellow.


1.
Desert Yellow plus a small amount of Oak Brown
2.
Desert Yellow.
3.
Desert Yellow plus Matt White.
4.
plus more Matt White.
Desert Yellow plus a small amount of Oak Brown
2.
Desert Yellow.
3.
Desert Yellow plus Matt White.
4.
plus more Matt White.


1. Desert Yellow plus Oak
Brown.
2. Desert Yellow.
THE BLUE BITS
These are the trim to the chainmail, details on the gloves and
boots and the shoulder pauldron. Colours as follows:
boots and the shoulder pauldron. Colours as follows:
3. Desert Yellow plus Matt
White.
4. plus more Matt White.
1.
Wolf Grey and Matt Black.
2.
plus Wolf Grey and Matt White.
3.
plus Matt White.
4.
plus Matt White.
Wolf Grey and Matt Black.
2.
plus Wolf Grey and Matt White.
3.
plus Matt White.
4.
plus Matt White.
THE BUFF BITS
Boots and gloves. Take care to delineate the fingers carefully if
you can, even if you have to go back and neaten up between
them with a tiny bit of Matt Black. Colours as follows:
you can, even if you have to go back and neaten up between
them with a tiny bit of Matt Black. Colours as follows:


1. Wolf Grey and Matt Black.


4. plus Matt White.
THE WHITE BITS
Just a tiny bit of tunic, it is a bit of a pain to do neatly but worth
it as it provides a nice bit of delineation. There is more tunic on
show on the archers.
it as it provides a nice bit of delineation. There is more tunic on
show on the archers.
1.
Desert Yellow plus Oak Brown
2.
plus Matt White.
3.
plus Matt White.
4.
plus Matt White.
Desert Yellow plus Oak Brown
2.
plus Matt White.
3.
plus Matt White.
4.
plus Matt White.


1. Desert Yellow plus Oak
Brown.
2. plus Matt White
4. plus Matt White.
4. plus Matt White.
1.
Ash grey plus Matt White.
2.
plus Matt White.
3.
plus more Matt White.
4.
pure Matt White.
Ash grey plus Matt White.
2.
plus Matt White.
3.
plus more Matt White.
4.
pure Matt White.
THE DARK GREY BITS
Trousers, colours as follows:
1.
Uniform Grey plus Matt Black.
2.
plus Matt White.
3.
plus more Matt White.
4.
plus more Matt White.
Uniform Grey plus Matt Black.
2.
plus Matt White.
3.
plus more Matt White.
4.
plus more Matt White.


1. Ash grey plus Matt White.
4. pure Matt White
4. pure Matt White
4. pure Matt White
THE GREY BITS
Helmet plumes and arrow flights, colours as follows:
1.
Uniform Grey.
2.
plus Matt White .
3.
plus more Matt White.
4.
plus more Matt White.
1.
Uniform Grey.
2.
plus Matt White .
3.
plus more Matt White.
4.
plus more Matt White.

1. Uniform Grey plus Matt
Black.

1. Uniform Grey.

2. plus Matt White.


4. plus Matt White.
PART 1